Easy DIY Peppermint & Lemon Essential Oil Shower Melts
DIY shower steamers with essential oils – easy to make and great for soothing during the cold winter months, this homemade recipe smells amazing!
Ingredients
Scale
- 1 1/2 cups cornstarch
- 10 drops peppermint essential oil
- 10 drops lemon essential oil
- 10 drops cedarwood essential oil
- 10 drops myrrh essential oil
- 10 drops fir balsam essential oil
- 1 Tablespoon Witch Hazel (I prefer Thayers Rose Petal Witch Hazel<img decoding="async" id="amznPsBmPixel_8187330" style="border: none !important;margin: 0px !important;padding: 0px !important;height: 0px !important;width: 0px !important" src="https://ir-na.amazon-adsystem.com/e/ir?source=bk&t=livingwellmom-20&bm-id=default&l=ktl&linkId=4711c17d2e40e942a672bfc0b98de9d9&_cb=1547236987800" alt="" width="0" height="0" border="0" />
)
- Food Coloring
(optional)
- Water – 3 to 4 tablespoons to start, more will likely be needed
- ice cube tray or silicone molds (I used this one
I got on Amazon)
- medium size bowl
- mixing spoon


Instructions
- You’ll begin by adding cornstarch to your mixing bowl, then stir in the witch hazel.
- Next, you’ll want to stir in your essential oils.
- You will want to add a total of about 50 drops of essential oils to this DIY recipe.
- After you add the essential oils, whisk them well into your corn starch.
- Optional: if you want to make your peppermint & lemon essential oil shower melts more fun, you can add some color to them!
- I decided on blue for our peppermint & lemon essential oil shower melts. Add a couple drops of food color.
- Then you’ll want to add the water.
- It will start as a dry, crumbly mixture. Add water a few drops at a time and mix well. Then a few more drops and mix some more. Repeat until you get JUST past the crumbly point and the color is mixed in.
- If the mixture gets too wet, add a little more cornstarch.
- When you are done mixing your shower melts “oobleck”, go ahead and pour it into your silicone mold.
- Then put it in the freezer for a few hours. I had to use my chest freezer as this wouldn’t fit in my side refrigerator freezer.
- Once you take them out of the freezer, they will pop right out of the mold. Or you can let them sit for a few days until they are fully dry, then pop them out of the mold.
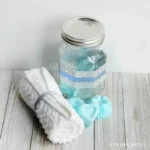
- After they are out of the mold, store them in a jar in a cool, dry place.