If you’re like me, meal planning is one of those things that always ends up on the back burner. It can be so time-consuming, and frankly overwhelming! But what if I told you there was an easy way to meal plan? Yes, it exists and I finally found it! That’s why I’m sharing this Plan to Eat review. This is my all-time favorite way to wrangle in meal planning once and for all.
I’m super excited to share this online meal planner with you all today. I can’t believe I haven’t talked about it before! I’ve used Plan to Eat for years and it continues to be the perfect tool for organizing recipes, quickly planning meals, and creating groceries lists (fast.)
With Plan to Eat, you can easily import recipes from your favorite websites, create a custom grocery list, and generally make mealtime a breeze. It may sound complicated, but I promise you it’s a very user-friendly way to plan out meals fast. In this post, I’ll walk you through the entire thing.
Trust me, this game-changing tool is worth its weight in gold!
Why I decided to try out Plan to Eat
Okay, first, let’s just put the obvious out there: making meals that are satisfying, nutritious, and kid-friendly can be a daunting task. And when you add in the fact that you need to have a plan and can’t (always) just toss a bag of chicken nuggets in the microwave, meal planning feels extremely overwhelming.
I always knew meal planning was better for my budget and my family’s health, but to be honest, it overwhelmed me just thinking about the recipes, prepping food, creating a meal plan, planning out shopping lists, keeping track of food costs, etc, etc…the list felt endless. And I’ll admit that I struggled with it despite my good intentions.
However, all that changed when I came across this tool called Plan to Eat that helped organize my recipes and menus for the week (and even month!). With its comprehensive calendar and recipe management system, I can easily make my family’s favorite recipes in a way that fits our budget and time constraints.
How does Plan to Eat work?
A big part of this Plan to Eat review is showing you how it works so you can decide if it’s right for your family. One of the reasons I love this method so much is that it is actually 3 tools in 1. Here’s how each works.
1) Add your recipes.
Adding recipes to Plan to Eat couldn’t be simpler. You can easily “clip” recipes from online websites, or manually import them in. It’s like Pinterest, but so much more organized and efficient.
Think of this process as creating your ultimate cookbook or recipe box, minus the mess! I typically organize and store all my recipes in Plan to Eat. I have also added my personal family recipes so I can easily search and plan to make them.
The process of clipping is super simple. You can either import it by adding the internet URL in the app, or use the web browser button on your favorites bar to easily add recipes you are interested in from any blog or website you like. Using this tool has been my all-time favorite way to organize and store recipes—and I’ve tried dozens!
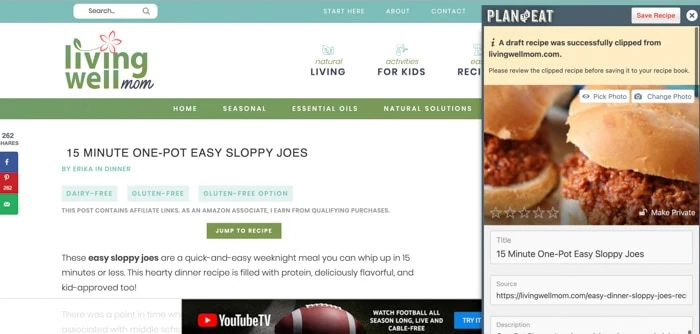
Once you have your recipes added into Plan to Eat, you can organize them. I personally sort my recipes by course. You can edit the course names easily to make them work for you.
Because I use Plan to Eat for meal planning, I divided some of my main meal recipes into subcategories such as chicken, ground beef/turkey, meatless, fish, etc. It’s also just super easy to search recipes with the search button on the site and app.
Quick tip: for your most-used categories put an @ in front and it will bump those to the top.
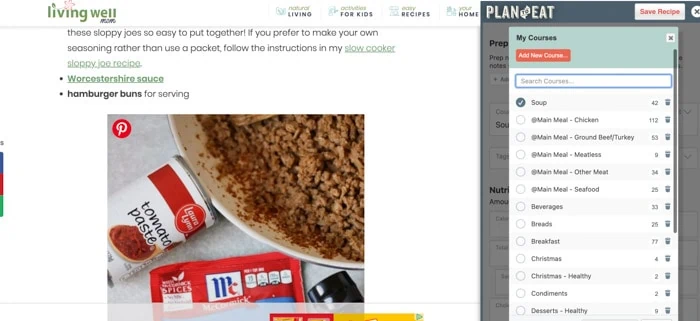
You can also easily tweak recipes. For example, here’s my Aloha chicken recipe. The original recipe makes enough for about 4 people. Well, I have 4 kids so I definitely need extra portions of this meal.
To change the number of servings, simply scroll down to the recipe cards section and hit the scale function before you clip, and it will update the recipe.
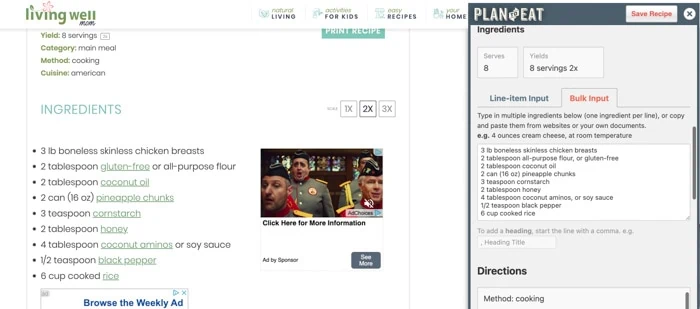

I also love that you can easily adjust ingredients. For example, if you prefer using soy sauce instead of coconut aminos (or vice versa) you can change it here.
2) Create your meal plan.
Now that you have a nice database of recipes to choose from, it’s time to use the meal planner function. I prefer to keep it as simple as possible. I don’t include breakfast, lunch, or snacks – I mainly just use it for dinners.
When I go to make my plan, I like to filter recipes by course, then sometimes tags. Once I choose what sounds good, I drag and drop it into the calendar or just open the recipe and click “Add to Planner”.
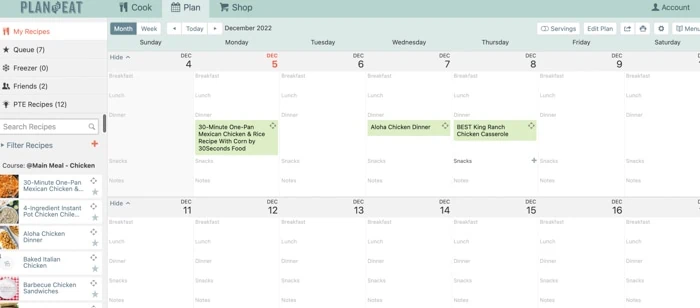
Once it’s in the calendar, you can use one of my favorite features – the leftovers function! If you know you are going to have leftovers, you can hit the “plan as leftovers” button on the recipe to create a box, then assign that meal to a day so you know when you’ll be enjoying leftover nights that week.
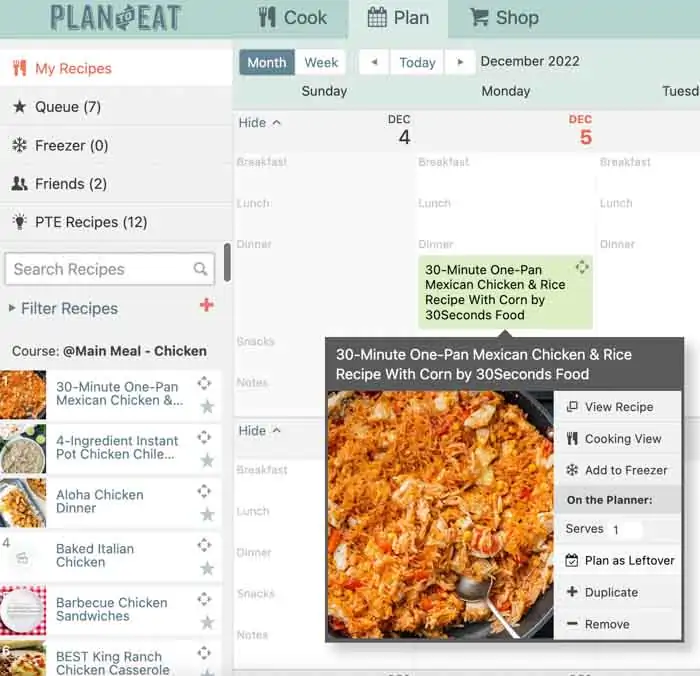
Quick tip: I like to have my family calendar open while I’m meal planning because it helps me choose which meals to make for my family’s schedule. On busier afternoons I may opt for a crockpot dinner that I need to start in the morning, or on slower days, I might have time for a longer oven dinner like baked ziti.
Once I have the meal plan in place, I open my to do list app and take 5 min to add the meals, including notes on when I need to defrost meat, to my task list for that day. It just makes meal planning an unobtrusive part of your daily routine to do these little tasks!
3) Make your shopping list.
Here’s where this tool gets really good. One of the key features of the app is that it makes a shopping list for you! When you add recipes to the planner, it automatically adds the ingredients to the shopping list section.
You can customize it by adding the different stores you shop at and even assigning certain ingredients. For example, I always buy dishwasher detergent from the warehouse club so that is automatically assigned to BJ’s. But other items may vary, like milk, for example.
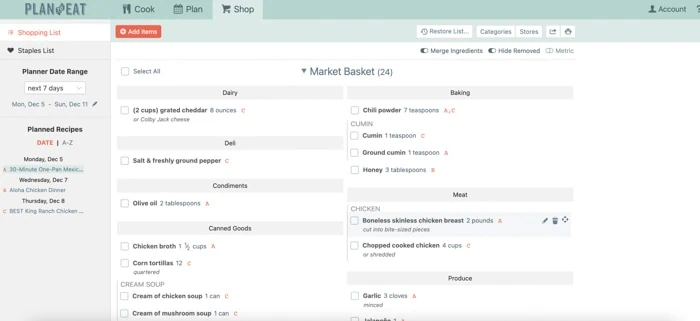
You can create a customizable staples list with items you regularly buy. Plan to Eat remembers for us so we don’t have to!
Quick tip: there’s an app for mobile devices (both ios and android) – so it’s super handy to use when I’m at the grocery store. As I add things to my cart, I just check things off.
I also use this list function to add things as I’m cooking and finish the last of an ingredient that I like to keep on hand. It also works perfectly when a family member tells me we need something (for example, when I hear “we’re low on cereal, Mom.”!) I simply open the app and take 5 seconds to add it to the list.
Plan to Eat Review: Cooking with Plan to Eat
Okay, so I’ve shared why this tool is so incredible for the planning phase. But how does it work when it’s actually time to cook? It’s so easy!
All you need to do is pull up the calendar view, click on the box with that day’s recipe, and click the “view recipe” button. It will pull up the recipe along with your shopping list items and step-by-step instructions for you to follow and start cooking.
What does Plan to Eat Cost?
Now we get to the really good part of this Plan to Eat review. I’m pretty frugal, but I would pay a premium dollar for this tool because it has been truly life-changing. But, it’s SO affordable and worth every single penny (and then some).
Plus, I’ve got a discount to share with you too!
An annual subscription is just $39 per year, or you can pay monthly if you prefer. And, to make it even better, you can enjoy a 20% discount when you purchase through my affiliate link! For full disclosure, I do earn a small commission towards my own subscription, but I genuinely believe in this tool (and have used it for years).

Plan to Eat review: final thoughts
If you’re looking for a meal planning tool that will make your life easier, I highly recommend giving Plan to Eat a try. It’s been a total lifesaver for me in terms of reducing stress and saving time (and money).
The process is simple and straightforward, the customer service is excellent, and the recipes are delicious. Plus, there’s a huge variety so you can find meals that satisfy both your taste buds (and your family’s) as well as your health goals. Give it a go – I promise you won’t regret it!
More Ways to Get Organized
- 4 Smarter Ways to Organize Your Medicine Cabinet (with Stuff Around the House)
- How to Organize Spices the Simple Way
- How to Organize Paperwork Once and For All in 3 Simple Steps
- The Easy Way to Organize Kids’ Clothes

Lara says
This is great, but we plan our meals after Church on Sunday around the breakfast table. I write it down and shop from there. Sometimes I don’t need a recipe, like for spaghetti, venison steak, chili. Then I go to my Paprika app and if I need a recipe I’ll put it in my planner. It’s worked for years, for me and we all get a say in what we’re having