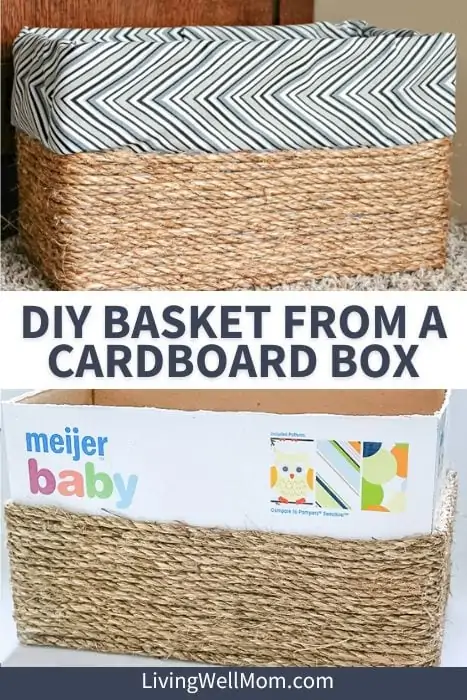
Save money while adding storage to your home by transforming a cardboard box into a DIY basket. Learn how to make a stylish and cost-effective DIY storage bin using simple materials such as fabric, rope, and an ordinary cardboard box.
It seems I can never have enough boxes, baskets, or storage containers to keep everything organized. Can you relate? Unfortunately, store-bought baskets and organizing things can be expensive, even when they’re on sale.
That’s why I’ve been slowly creating my own baskets and beautiful storage boxes from old shipping boxes, diaper boxes, and other boxes I have on hand.
I LOVE the results! And you will, too! Today we’re going to have a little crafting fun as I share my tutorial on how to make your own storage baskets out of ordinary cardboard boxes.
Looking for more organization hacks and DIYs? Here’s a whole round-up of organizing ideas just as handy as this basket storage!

Supplies needed to make a basket out of a box
Here’s everything you’ll need. I’ve included a few handy links to help you find items faster.
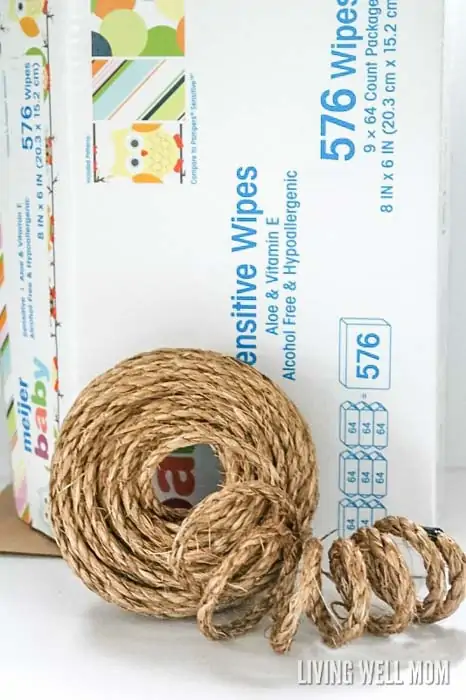
- A sturdy box the size you want your basket to be
- Roll of twine
or rope
- Glue gun
and hot glue sticks
- Fabric


How to make a basket
Prepare to be pleasantly surprised at how easy this craft project is!
Step 1
Begin by cutting the top flaps off of your box if it has them.
Step 2
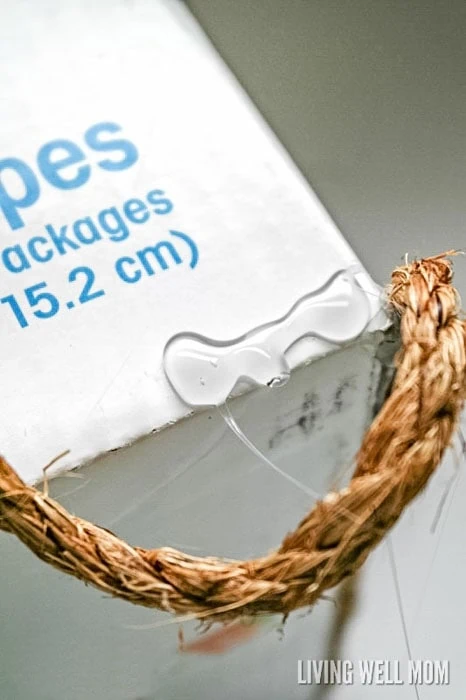
Use hot glue to attach one end of the rope or twine to your box.
Note: I used rope rather than twine for a heavier look. The thicker your rope or twine is, the less you will need to complete this project. I used about 50′ of rope to cover 2/3 of my box (approximately 7″ W x 13″ L x 9″ H).
Step 3
Begin wrapping the rope around the box using hot glue to secure it every few inches.
The rope does not need to be fully glued down. Gluing every few inches will keep the rope in place and maintain a nice, tight wrap.
Step 4
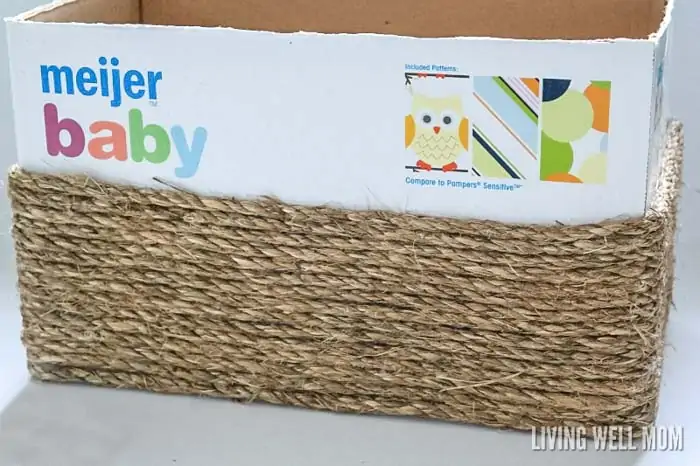
Continue wrapping and securing the rope until you’ve covered 2/3 of the box.
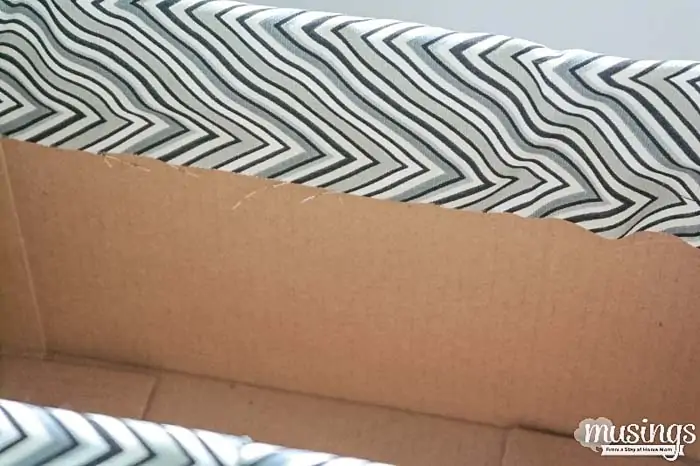
Step 5
Cut a strip of fabric long enough to go around your box. The strip should be twice as wide as the exposed area above the rope + 1″.
Note: In my case, my exposed area is about 3″, so my fabric strip was 6 1/2″ wide.
Step 6
Add a bead of hot glue along the top of the rope, working on one side at a time. Fold over one edge of the fabric 1/2″ and press it against the hot glue.
The right side of the fabric will be against the box so that when it is folded later, the pretty side will be exposed. Use a knife or boning tool to tuck the fabric tight against the rope.
Repeat with all sides of the box.
Step 7
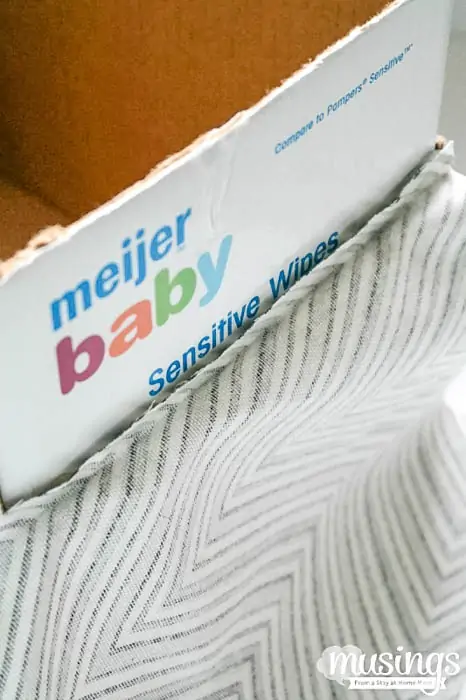
When the fabric has been attached all the way around the box, fold it up and into the inside of the box. Use additional glue to secure the fabric to the inside of the box.
Step 8
I highly recommend fully lining the box to get a professionally finished look. However, that depends on how you plan to use your new basket. I will be using mine on shelves where the inside will not be seen.
This is a super easy, no-sew way to create the look of a lined storage bin without the extra work! It took me about 45 minutes to make this basket and less than $5 in supplies!
See how easy it is to make your own basket? You can totally do it too!

Tips for making your DIY basket
Here are some helpful tips I have received from some readers that can help make this project even better. (Thank you!)
- Add more stability: Carla offered the idea of folding the box flaps down inside the box nicely (if large enough) to add even more stability to the completed basket.
- Glue fabric first: Susan had another great idea and recommended starting with the fabric glued to the box along a line, then covering the edge of the fabric with the rope or twine. You won’t need to turn over the raw edge as described, which makes it easier and results in fewer wrinkles.
DIY basket project FAQs
Here are the answers to a couple of questions that I see readers frequently ask about making your own DIY rope basket.
Would this DIY basket work well for storing kids’ toys?
Unfortunately, no. Upcycling boxes in this way is more for appearance and storing items that won’t need to have the durability that kids’ storage often demands.
I like to use these boxes to store things like yarn, papers, candles, and other items that I don’t need to put in or pull out all the time.
How do I make a storage basket?
You can make a beautiful storage box by upcycling a regular cardboard box and transforming it with some fabric and twine (or rope). This is a cost-effective way to add beautiful storage to your home.
I hope you love this DIY basket project! I had so much fun making mine and feel a twinge of excitement every time I use my homemade organizer bin (or see it)!
Does the fabric look familiar? I used a scrap that I had left from my DIY Toy Box Makeover!
More DIY and crafting ideas you’ll love
If you like this project, here are more simple DIY ideas you may love!
Anne-Marie @ This Mama Cooks! On a Diet says
I have some banker boxes I’m going to try this out on and maybe do the lid as well with cloth. I need pretty storage for my photography props and am tired of spending money on ugly plastic boxes.
Dawn says
That is pure genius. It looks just like a store bought basket, but it’s so much easier.
Nancy @ Whispered Inspirations says
OMG, I love this. So pretty!
Jennifer Sikora says
This is the most adorable thing I have seen. I just showed it to my daughter and I think we are going to try and do some of these for her room.
Meagan says
Wow, you are so creative! I have so many diaper boxes lying around, going to give this a try!
Tammi @ My Organized Chaos says
And you pay quite a bit for something similarly made in stores! I’m all for this, great idea!
Mindy McGowan says
Wow, what a great idea! I love baskets, but they are SO expensive. I have a million boxes laying around, though. I will have to make some of my own now. Thanks!
lisa says
That is a really neat idea!! This box is so cute!
Dee Mauser says
Wow, I need to start doing this. Being a blogger we get tons of boxes to throw away.
Liz Mays says
That turned out so great. I need to do something like this in my office.
Amy Desrosiers says
This is such a great idea! My kids have way too many toys and I need a stylish way to store their stuff.
Ann Bacciaglia says
This is such a great idea. It looks fantastic and is so easy to make. I will have to try making one this weekend.
Chelley @ AisForAdelaide says
This is such a spectacular idea! I am always looking for more supportive baskets- I think this may be the answer!
Sarah @ Must Have Mom says
This is such an awesome idea! How cute! Thanks for sharing.
Marina John says
This is soo creative! I would have never guessed there was cardboard underneath! Very cool!
Mistee Dawn says
This is such a fabulous idea! We have boxes laying around all over the place. Finally I can put them to good use.
Lena Burkut says
Such a lovely basket. I might just try it
Ronni says
So cute! I totally have a basket addiction. It’s getting quite expensive. I may just have to pull out the hot glue gun and get to working! I love this!
Dogvills says
I love this. I always have boxes around the house and this is such a clever way to recycle them.
Stacey - Travel Blogger says
That is too awesome. I would have never guessed that was a box!
Jenny Temcio says
You are so crafty! I love those baskets but they are always so expensive. I will have to try this.
Dawn McAlexander says
I did a fabulous job! I would have never thought to make a basket like this.
valerie g says
I would never have thought to do this. What a great idea!! love it!
Melissa says
This is amazing! What a fantastic idea for all of the boxes I have lying around.
Myrah - Coupon Mamacita says
Gorgeous and so simple to do! How would have known!
Susan Hammill says
Hello Raquel,
What a great idea. Could I suggest starting with the fabric glued to the box along a line and then cover the edge of the fabric with the rope or twine? Then you wouldn’t need to turn under the raw edge as described. I think it might be easier to do and have fewer wrinkles.
Thanks for sharing your idea.
Sue
Erika says
Great idea, Susan. Thanks for mentioning this!
Gloria Kourounis says
That’s what I’m going to do!
glo says
I am glad that I came across your post on facebook. I am two sets of shelves that I have been wanting baskets for and now I know an inexpensive and crafty way to fill them with.
Erika says
Glad to hear it, Glo! Have fun!
Linette D. says
I’m trying to do this project but struggling. Do you wrap the box without ever cutting the rope or do you cut a new piece of rope for every row?
Zonia says
Pin this for future tasks..Excited to do my own basket! 😉
Nancy says
This is a perfect idea! This box could even be stored in the living room! Going to try it myself! Thanks.
Nancy says
What can I say? I need this! Thanks!
Carla says
I think if it is possible to fold the box flaps down inside the box nicely (if large enough) it would add even more stability to the completed basket.
Erika says
Hi Carla, that’s a great idea for adding more stability to your basket box. Thanks for sharing.
Elisaa says
You are so crafty! I love those baskets but they are always so expensive. I will have to try this.
Erika says
Thank you! Yes, they are expensive to buy. I am always surprised when I shop for them.
kolo says
I am Going To Try It Myself For My Room.
Samson says
This Is Amazing I Will Must Try.